Buscar este blog

sábado, 1 de diciembre de 2018

Create timestamp certificate

This procedure is explained with KeystoreExplorer (http://keystore-explorer.org/)

1 - Create the CA

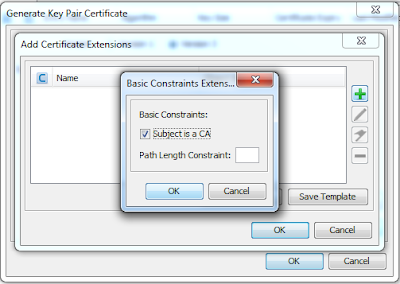
The important thing is to set the following extensions:
  • Basic Constraints: Subject is a CA
  • Key Usage: Certificate Signing


2 - Create the timestamp certificate

The important thing is to set the following extensions:
  • Extended Key Usage: Time Stamping [Critial extension]


sábado, 28 de julio de 2018

Autofirma - Gestión de actualizaciones

Un tema bastante molesto relacionado con Autofirma es el control de las actualizaciones. Al ser un componente instalado en el equipo del usuario es él quien, en última instancia, decide qué versión instalar y cuándo actualizarla.

Cuando se desarrolla una aplicación web generalmente se prueba contra una versión concreta de @Firma, Autofirma incluida, y se certifica para su uso con ella. La parte de servidor no presenta ningún problema, puesto que se tiene control total sobre ella, no así la parte cliente. En cualquier momento puede publicarse una nueva versión de Autofirma y, gracias a la función automática de comprobación de actualizaciones, el usuario puede actualizarla. En este caso podrían presentarse problemas si esta nueva versión no es totalmente compatible con la anterior.

En este post se explicará cómo hace Autofirma la gestión y control de las actualizaciones y de qué forma se podría intervenir para prevenir los avisos al usuario.


Cada vez que se inicia Autofirma, ésta revisa si está configurada para comprobar de forma automática si existe una nueva actualización. En caso afirmativo, consulta en una URL pública cuál es la última versión disponible y la compara con su versión interna. Si la primera es mayor a la segunda, entonces redirige al usuario a una segunda URL para que proceda a su descarga manual.


Concretamente, al URL de descarga a día de hoy es http://firmaelectronica.gob.es/Home/Descargas.html


Existe una opción de configuración del componente que permite deshabilitar la consulta automática de actualizaciones, pero debe establecerlo explícitamente así el usuario, puesto que por defecto ya viene marcada.


A nivel técnico, el proceso descrito se controla de dos modos:
  1. Gestión de preferencias de usuario
  2. Consulta de actualizaciones
La gestión de preferencias de usuario se hace desde la  clase es.gob.afirma.standalone.ui.preferences.PreferencesManager. Esta clase gestiona dos objetos de propiedades, las preferencias guardadas y las preferencias por defecto.
static {
 preferences = Preferences.userNodeForPackage(PreferencesManager.class);

 properties = new Properties();
 try {

  properties.load(PreferencesManager.class.getResourceAsStream("/properties/preferences.properties" //$NON-NLS-1$
  ));
 } catch (final Exception e) {
  LOGGER.severe(
    "No han podido cargarse los valores por defecto del fichero de configuracion de preferencias, se usaran los valores por defecto: " //$NON-NLS-1$
      + e);
 }

}

Las preferencias se guardan empleando la clase java.util.java.util.prefs.Preferences, que en el caso de windows, persiste bajo la clave de registro HKEY_CURRENT_USER\Software\JavaSoft\Prefs\es\gob\afirma\standalone\ui\preferences.
Las preferencias por defecto se guardan dentro del propio jar,en el fichero preferences.properties.
(...)
#Panel General de Preferencias
signatureAlgorithm = SHA256withRSA
omitAskOnClose = false
hideDnieStartScreen = false
checkForUpdates = true
useAnalytics = true
enabledJmulticard = true
defaultSignatureFormatPdf = PAdES
defaultSignatureFormatOoxml = OOXML (Office Open XML)
defaultSignatureFormatFacturae = FacturaE
defaultSignatureFormatOdf = ODF (Open Document Format)
defaultSignatureFormatXml = XAdES
defaultSignatureFormatBin = CAdES
(...)

La consulta de actualizaciones se hace desde la clase es.gob.afirma.standalone.updater.
private static void loadProperties() {
 if (updaterProperties != null) {
  return;
 }
 updaterProperties = new Properties();
 try {
  updaterProperties.load(Updater.class.getResourceAsStream("/properties/updater.properties")); //$NON-NLS-1$
 }
 catch (final Exception e) {
  LOGGER.severe(
   "No se ha podido cargar el archivo de recursos del actualizador: " + e //$NON-NLS-1$
  );
  updaterProperties = new Properties();
 }
}

Las propiedades de consulta de versión se mantienen en un fichero independiente llamado updater.properties:
# Numero de version visible
currentVersionText.WINDOWS=1.6.4
currentVersionText.LINUX=1.6.4
currentVersionText.MACOSX=1.6.4

# Numero de version interno (numero entero). Si es par se trata de una version preliminar.
# Este numero no avanzara dentro de las distintas versiones preliminares anteriores a una
# version final. Cuando se establezca un numero impar, se identifica una version final.
currentVersion.WINDOWS=10
currentVersion.LINUX=10
currentVersion.MACOSX=10

# AutoFirma en Windows buscara si hay nuevas versiones y lo notificara al
# usuario remitiendole a la pagina de descargas
url=http://estaticos.redsara.es/comunes/autofirma/autofirma.version
updateSite=http://firmaelectronica.gob.es/Home/Descargas.html

Tal y como se aprecia la URL de consulta de versión es http://estaticos.redsara.es/comunes/autofirma/autofirma.version, que actualmente devuelve el valor 8.


Por tanto, de cara a tener un mayor control sobre el proceso de actualización se podrían hacer las siguientes modificaciones sobre estos ficheros:
  1. En el fichero preferences.properties configurar que no se marque por defecto la opción de comprobación de actualizaciones. Bastaría con cambiar la propiedad checkForUpdates.
  2. En el fichero updater.properties configurar la URL de comprobación de versión a una dirección controlada, y que se devuelva la versión compatible con la aplicación en la que se use. Bastaría con cambiar la propiedad url.


En cualquier caso, una vez hecho el cambio habría que recompilar el código y generar de nuevo el instalador: Autofirma - Compilación manual para Windows

Autofirma - Compilación manual para Windows

En este post resumo los pasos básicos para compilar y construir el instalador de Autofirma a partir del código del Github del Ministerio. Autofirma forma parte de la suite del cliente de firma elctróncia de @firma, siendo el componente encargado de hacer las firmas desde el equipo de usuario.

En esta prueba simplemente generaré la versión de 64 bits del instalador para Windows.

1 - Configuración de Maven

La versión de maven que usaré es la 3.5.0 con java 1.8 de 64 bits:
>mvn --version
Apache Maven 3.5.0 (ff8f5e7444045639af65f6095c62210b5713f426; 2017-04-03T21:39:06+02:00)
Maven home: C:\Program Files (x86)\Apache Software Foundation\apache-maven-3.5.0\bin\..
Java version: 1.8.0_111, vendor: Oracle Corporation
Java home: c:\Program Files\Java\jdk1.8.0_111\jre
Default locale: es_ES, platform encoding: Cp1252
OS name: "windows 7", version: "6.1", arch: "amd64", family: "windows"

No creo que haya problemas por utilizar otra versión cercana.

2 - Descarga de Launch4J

Cuando se tenga el jar de Autofirma se deberá empaquetar (más bien envolver) en un archivo ejecutable de windows. Para ello se necesitará usar la herramienta Launch4J.
La versión con la que lo probé es la 3.12, en su modalidad portable: https://sourceforge.net/projects/launch4j/files/launch4j-3/3.12/.
Basta con descargarse el zip y descomprimirlo.

3 - Descarga y configuración de NSIS

Con el exe creado por Launch4J ya se podría ejecutar la aplicación (a falta de un JRE), pero al usuario se le entrega un instalador (wizard) que se encarga de copiar el ejecutable a donde corresponda, crear entradas de registro, registrar la aplicación, etc. Para ello se usa NSIS (Nullsoft Scriptable install System).

La versión con la que probé es la 2.5.1, también en modalidad portable: https://sourceforge.net/projects/nsis/files/NSIS%202/2.51/.
Basta con descargarse el zip y descomprimirlo.

Una vez extraído hay que instalar el plugin de NsProcess, versión 1.6.7: http://nsis.sourceforge.net/NsProcess_plugin. Es un zip que contiene varias carpetas:
  • Example
  • Include
  • Plugin
  • Source

Hay que copiar el contenido de Include y Plugin a los subdirectorios correspondientes dentro del directorio de instalación de NSIS.

4 - Compilación y empaquetado de jmulticard

Uno de los módulos de @Firma tiene una dependencia con un artefacto del proyecto jmulticard. En el caso concreto de la versión 1.6.2 de @Firma la dependencia es con la versión 1.5-SNAPSHOT de jmulticard (sí amigos, tenemos una release que dependen de un snapshot, un clavo más en el ataúd del clean code).

En este caso me descargué directamente y compilé directamente el master: https://github.com/ctt-gob-es/jmulticard.

5 - Compilación y empaquetado de @Firma

Por fin entramos en materia con @Firma. En esta prueba me descargué el tag 1.6.2 del repo principal: https://github.com/ctt-gob-es/clienteafirma.

Justo en la versión 1.6.2 hay un bug (o más bien una mala praxis en el desarrollo) y es necesario hacer una pequeña corrección en un fichero pom. Concretamente, en el fichero \afirma-standalone\afirma-ui-standalone\pom.xml se deberá modificar la propiedad afirma.core.version, que vale 1.7-SNAPSHOT a la 1.6 (se ve que el tema de la gestión de versiones todavía no lo tienen muy dominado).
<properties>
 <project.build.sourceEncoding>utf-8</project.build.sourceEncoding>
 <afirma.keytool.keystore>${basedir}/afirma.keystore</afirma.keytool.keystore>
 <afirma.keytool.alias>codesign</afirma.keytool.alias>
 <afirma.keytool.password>afirma</afirma.keytool.password>
 <afirma.core.version>1.7-SNAPSHOT</afirma.core.version>
</properties>

Una vez hecho esto, y según lo que pone en el propio README del proyecto, la compilación se hará en dos pasos:
- mvn clean install, para generar los módulso básicos y los servicios.
- mvn clean install -Denv=install, para generar los artefactos desplegables y aplicaciones

Completada la instalación, los artefactos más relevantes para generar posteriormente el instalador de Autofirma serán los siguientes:
  • \afirma-simple\target\AutoFirma.jar
  • \afirma-ui-simple-configurator\target\AutoFirmaConfigurador.jar

6 - Generación del instalador de Autfirma

Para montar el instalador se tienen que ejecutar los siguientes pasos:
  1. Generación del ejectuable de Autofirma
  2. Generación del ejecutable del Configurador
  3. Generación del ejecutable del Command Line
  4. Generación del instalador de Autofirma
En este caso sólo usaré los archivos de windows de 64 bits.

6.1 Generación del ejecutable de Autofirma

Se copiará el archivo Autofirma.jar, creado anteriormente, al directorio \afirma-simple-installer\jar\.

Luego se cargará el fichero \afirma-simple-installer\AutoFirma_launch4J_project_64.xml en Launch4J y se lanzará su ejecución.


El resultado será el fichero \afirma-simple-installer\AutoFirma64\AutoFirma.exe

6.2 Generación del ejecutable del Configurador

Se copiará el archivo AutoFirmaConfigurador.jar, creado anteriormente, al directorio \afirma-simple-installer\jar\.

Luego se cargará el fichero \afirma-simple-installer\AutoFirma_launch4J_Configurador_project_64.xml en Launch4J y se lanzará su ejecución.


El resultado será el fichero \afirma-simple-installer\AutoFirma64\AutoFirmaConfigurador.exe

6.3 Generación del ejecutable del Command Line

También a partir del AutoFirma.jar, se cargará el fichero \afirma-simple-installer\AutoFirmaCommandLine_launch4J_project_64.xml en Launch4J y se lanzará su ejecución.


El resultado será el fichero \afirma-simple-installer\AutoFirma64\AutoFirmaCommandLine.exe

6.4 Generación del instalador de Autofirma

Lo primero será copiar un JRE 1.8 en el directorio \afirma-simple-installer\java64. El instalador incorporará el JRE internamente, de modo que dentro del directorio final de instalación del usuario también se incluirá éste, que será el que utilice en última instancia Autofirma durante su ejecución.

Se lanzará la herramienta makensisw.exe que se incluye dentro del directorio de instalación de NSIS. Sobre ella se cargará el fichero \afirma-simple-installer\AutoFirma_NSIS_project_EXE_64.nsi y se lanzará la creación del instalador.


El resultado final será el fichero \afirma-simple-installer\AutoFirma64\AutoFirma_64_v1_6_2_installer.exe. 

Por fin hemos conseguido el instalador!!

domingo, 8 de julio de 2018

JAXB - XMLGregorianCalendar - Blank date value

When you work with web services or other schema-based objects, date fields are interpreted as XMLGregorianCalendar.

For example if you have this schema:
<xs:simpleType name="timeStamp">
 <xs:annotation>
  <xs:documentation>timeStamp</xs:documentation>
 </xs:annotation>
 <xs:restriction base="dateTime" />
</xs:simpleType>

You will end with this POJO:
   @XmlSchemaType(name = "dateTime")
   protected XMLGregorianCalendar timeStamp;

The problem here is that when you want to transform this POJO in XML (marshalling), the timestamp value will always be empty.

I found this problem working with Camel and CXF. Clients connect to the Camel route throught a SOAP web service by using only simple data types (a string wich contains an XML), while inside the route this XML is transformed into a java object and sent to a second web service. The response run throught the inverse process.

Something like this:
   final JaxbDataFormat jaxb = new JaxbDataFormat("xxx.xxxx.xxxx.xxx");
   jaxb.setEncoding("UTF-8");      

   from("cxf:bean:simpleServiceProvider") 
   .unmarshal(jaxb) 
   .to("cxf:bean:complexServiceClient")
   .setBody().simple("${body[0]}")
   .marshal(jaxb)
   .convertBodyTo(String.class, "UTF-8");

In this case the solution is to use java.util.Date instead XMLGregorianCalendar, so marshal step works fine.
As I posted before in Eclipse - Maven - Configure wsdl2java and wsdl2java - Use java.util.Date instead of XMLGregorianCalendar, you build your POJOs directly from the WSDL file. Besides, you can force wsdl2java to use Date instead XMLGregorianCalendar, so you should not have any problems.

Actually, in my new task, the WSDL file was a bit more complex, and schema files were external. In this case you have to configure the binding at schema-level instead WSDL-level:
<jaxb:bindings xmlns:xsd="http://www.w3.org/2001/XMLSchema"
 xmlns:jaxb="http://java.sun.com/xml/ns/jaxb" jaxb:version="2.0" 
 schemaLocation="dct.xsd"
 xmlns:xjc="http://java.sun.com/xml/ns/jaxb/xjc"
 jaxb:extensionBindingPrefixes="xjc">
 
 <jaxb:globalBindings>
  <jaxb:serializable uid="1" />
  
   <jaxb:javaType name="java.util.Date" xmlType="xsd:dateTime"
    parseMethod="org.apache.cxf.xjc.runtime.DataTypeAdapter.parseDateTime"
    printMethod="org.apache.cxf.xjc.runtime.DataTypeAdapter.printDateTime" />
        
 </jaxb:globalBindings>
</jaxb:bindings>

The schema file it is called dtc.xsd, with is referenced from schemalocation attribute.

sábado, 21 de abril de 2018

JasperReports Servers - Remote XML Datasource - Quick start guide

This is a quick-quick start post about how to configure a Jasper Report in JasperReports Server, which will obtain its data from a remote xml file.

Installation

For JasperReports Server I downloaded TIB_js-jrs-cp_6.4.3_bin.zip. This is the manual installation in which you deploy the Jasper War inside an application server, an you need a database already installed. In my case:
  • Application Server: Jboss EAP 6.4
  • Database: Postgresql 9.4
I just followed JasperReports-Server-CP-Install-Guide.pdf, placed inside docs subfolder.

For Jaspersoft Studio I downloaded TIB_js-studiocomm_6.5.1.final_windows_x86_64.zip. This is de "portable" version.

The report

My report will show the data readed from a remote XML placed in https://www.w3schools.com/xml/simple.xml. It containts the following structure:
<breakfast_menu>
 <food>
  <name>Belgian Waffles</name>
  <price>$5.95</price>
  <description>
   Two of our famous Belgian Waffles with plenty of real maple syrup
  </description>
  <calories>650</calories>
 </food>
 <food>
  <name>Strawberry Belgian Waffles</name>
  <price>$7.95</price>
  <description>
   Light Belgian waffles covered with strawberries and whipped cream
  </description>
  <calories>900</calories>
 </food>
 <food>
  <name>Berry-Berry Belgian Waffles</name>
  <price>$8.95</price>
  <description>
   Light Belgian waffles covered with an assortment of fresh berries and whipped cream
  </description>
  <calories>900</calories>
 </food>
 <food>
  <name>French Toast</name>
  <price>$4.50</price>
  <description>
   Thick slices made from our homemade sourdough bread
  </description>
  <calories>600</calories>
 </food>
 <food>
  <name>Homestyle Breakfast</name>
  <price>$6.95</price>
  <description>
   Two eggs, bacon or sausage, toast, and our ever-popular hash browns
  </description>
  <calories>950</calories>
 </food>
</breakfast_menu>

The first step is to create a new JasperReports Project.


Next, you create a new report. In my case, by using de Blank A4 template.


In the final creation step you need to create a new Data Adapter. The selected type must be XML document.


When configuring the data adapter, set the file URL and check de "Use de report Xpath expression when filling the report", this is the simplest way to do.

In the next step of the wizard, select the fields you want to show in your report.


Now, you will have these fields available in the design view. Drag an drop then to the Detail section of the report.

Once all fields are in place, and after some few adjustments, you can preview the result.

The publish

From Jaspersoft Studio you can publish your reports directly to the JasperReports Server. First create a the connection with the server.


As you can see, the report will be placed under /reports/Pruebas/SimpleRemoteReport.

You also will can find this report in JasperReport server web console.

The printing

In order to print this report, I will use the Rest API. It is documented in JasperReports-Server-REST-API-Reference.pdf document.

First, the login:
D:\PortableApps\curl-7.46.0-win32-mingw\bin>curl -v "http://localhost:8080/jasperserver/rest/login?j_username=jasperadmin&j_password=jasperadmin"
*   Trying ::1...
*   Trying 127.0.0.1...
* Connected to localhost (127.0.0.1) port 8080 (#0)
> GET /jasperserver/rest/login?j_username=jasperadmin&j_password=jasperadmin HTTP/1.1
> Host: localhost:8080
> User-Agent: curl/7.46.0
> Accept: */*
>
< HTTP/1.1 200 OK
< Server: Apache-Coyote/1.1
< Pragma: No-cache
< Cache-Control: no-cache
< Expires: Thu, 01 Jan 1970 01:00:00 CET
< P3P: CP="ALL"
< Set-Cookie: JSESSIONID=RsozmojD0KbbqmQbeIYhgQVB; Path=/jasperserver
< Content-Type: text/xml;charset=UTF-8
< Content-Length: 0
< Date: Sat, 21 Apr 2018 17:30:22 GMT
<
* Connection #0 to host localhost left intact

When you request the report, you need to add an extra param called net.sf.jasperreports.xml.source, which references the absolute URL of the remote XML file.
D:\PortableApps\curl-7.46.0-win32-mingw\bin>curl -v --cookie "JSESSIONID=RsozmojD0KbbqmQbeIYhgQVB;"  "http://localhost:8080/jasperserver/rest_v2/reports/reports/Pruebas/SimpleRemoteReport.pdf?net.sf.jasperreports.xml.source=https://www.w3schools.com/xml/simple.xml" -o myfile.pdf
  % Total    % Received % Xferd  Average Speed   Time    Time     Time  Current
                                 Dload  Upload   Total   Spent    Left  Speed
  0     0    0     0    0     0      0      0 --:--:-- --:--:-- --:--:--     0*   Trying ::1...
*   Trying 127.0.0.1...
* Connected to localhost (127.0.0.1) port 8080 (#0)
> GET /jasperserver/rest_v2/reports/reports/Pruebas/SimpleRemoteReport.pdf?net.sf.jasperreports.xml.source=https://www.w3schools.com/xml/simple.xml HTTP/1.1
> Host: localhost:8080
> User-Agent: curl/7.46.0
> Accept: */*
> Cookie: JSESSIONID=RsozmojD0KbbqmQbeIYhgQVB;
>
< HTTP/1.1 200 OK
< Server: Apache-Coyote/1.1
< Pragma: No-cache
< Cache-Control: no-cache
< Expires: Thu, 01 Jan 1970 01:00:00 CET
< P3P: CP="ALL"
< Content-Disposition: attachment; filename="SimpleRemoteReport.pdf"
< output-final: true
< Content-Type: application/pdf
< Content-Length: 1788
< Date: Sat, 21 Apr 2018 17:51:46 GMT
<
{ [1788 bytes data]
100  1788  100  1788    0     0   1569      0  0:00:01  0:00:01 --:--:--  1569
* Connection #0 to host localhost left intact

An "myfile.pdf" will be the final PDF.

martes, 27 de marzo de 2018

X509 Certificate Mock Servlet Filter

This is a way low-technolgy-solution to simulate, in web application, an SSL mutual authentication.  The obvious solution would be to configure Apache httpd as front-end, and let it to ask for the user certificate, but I had some problems with an android web browser...
So, instead configure Apache with a "SSLVerifyClient require" this is my ashamed solution: to configure a servlet filter (at first position in the chain) and, if there is no certificate in the request, just put one and go on.
import java.io.ByteArrayInputStream;
import java.io.IOException;
import java.io.InputStream;
import java.security.cert.CertificateFactory;
import java.security.cert.X509Certificate;

import javax.servlet.Filter;
import javax.servlet.FilterChain;
import javax.servlet.FilterConfig;
import javax.servlet.ServletException;
import javax.servlet.ServletRequest;
import javax.servlet.ServletResponse;

import org.slf4j.Logger;
import org.slf4j.LoggerFactory;

public class X509CertificateFilter implements Filter {
    private static final Logger LOGGER = LoggerFactory.getLogger(X509CertificateFilter.class);
    
    private static final String CERTIFICATE = "-----BEGIN CERTIFICATE-----\r\n" + 
            "MIIIdDCCB1ygAwIBAgIQIDbcJ3psq8FXD6IQBZA15DANBgkqhkiG9w0BAQsFADBN\r\n" +             
            "(...)\r\n" + 
            "740qIwTZlA4=\r\n" + 
            "-----END CERTIFICATE-----";
    
    @Override
    public void init(FilterConfig filterConfig) throws ServletException {                
    }

    @Override
    public void destroy() {        
    }
    
    @Override
    public void doFilter(ServletRequest request, ServletResponse response, FilterChain chain)
            throws IOException, ServletException {
        if (request.getAttribute("javax.servlet.request.X509Certificate") == null) {
            request.setAttribute("javax.servlet.request.X509Certificate", buildCertificates());
        }
        
        chain.doFilter(request, response);    
    }

    private static X509Certificate[] buildCertificates() {
        try {        
            final InputStream is = new ByteArrayInputStream(CERTIFICATE.getBytes());                    
            CertificateFactory cf = CertificateFactory.getInstance("X.509");
            X509Certificate cert = (X509Certificate) cf.generateCertificate(is);
            return new X509Certificate[] {cert};
        }
        catch(Exception e) {
            LOGGER.error("Error injecting certificate", e);
            return null;
        }
    }    
}

You can also configure multiple certificates, for example in a map, and use a request parameter to pick one...

domingo, 25 de marzo de 2018

JBoss datasources and transactions practical tests

Abstract

One question which arouse from time to time is how transactions work and what kind of configuration you need to set in your application in order to make it run, and to keep your databases clean (no lost writes or incosistent states). 

The question about how to make your application run is usually solved by developers with the classic try-and-error approximation. When you face an error, you could begin to change settings until the error disappear. Recently one of these problems was related with the access to two different databases through two JTA Datasources, and in the same transaction. The magic solution found was to change one of these Datasources to non JTA. 

The question about how to keep your databases clean depends on how you solved the error. As you will see later, that solution was not much safe, but probably they didn't know.

So, I decided to prepare a simple web application to try access to two different databases, throught different kinds of datasources, in the same transaction and by ussing different combiantions.

The source code of these tests is in my GitHub: https://github.com/evazquezma/jboss/tree/master/jboss-datasources

Glosary

These are the main terms used here:
  • Local transaction: A transaction which involves only one transactional resource.
  • Global transaction: A transaction which involves multiple transactional resources.
  • Distribuited transaction: A global transaction which spans over multiple hosts (in this case, servers).
  • XA: eXtended Architecture
  • XA Resource: Transactional resource which allows 2PC for global transactions.
  • 1PC: One Phase Commit
  • 2PC: Two Phase Commit

Test structure

The test application will be running in JBoss EAP 6.4. It will use Spring 3.X and Hibernate 4.X (sorry, I have in my to-do list to migrate all these stuff )

For these test there will a set of datasources provided for JBoss. Two of them will be datasources with JTA flag to false, two more with JTA to true (default value) and finally two XA-Datasources.
In each test the application will use different combinations of these datasources, but there will be always two different databases in the pitch.

Database access will be configured through Hibernate SessionFactory and Spring Transaction Manager:
<bean id="dataSource1" class="org.springframework.jndi.JndiObjectFactoryBean">
 <property name="jndiName" value="java:jboss/datasources/ExampleDSNoJTA"/>
</bean>

<bean  id="sessionFactory1" class="org.springframework.orm.hibernate4.LocalSessionFactoryBean" lazy-init="false">
 <property name="dataSource" ref="dataSource1"/>
 <property name="packagesToScan" value="es.sisifo.jboss.datasources.entity.one"/>
 <property name="hibernateProperties">
  <props>
   <prop key="hibernate.dialect">org.hibernate.dialect.HSQLDialect</prop>
   <prop key="hibernate.show_sql">true</prop>
   <prop key="hibernate.format_sql">true</prop>
   <prop key="hibernate.use_sql_comments">true</prop>
   <prop key="hibernate.hbm2ddl.auto">create</prop>

   <prop key="hibernate.validator.apply_to_ddl">false</prop>
   <prop key="hibernate.validator.autoregister_listeners">false</prop>

   <prop key="hibernate.transaction.factory_class">org.hibernate.engine.transaction.internal.jta.CMTTransactionFactory</prop>
   <prop key="hibernate.transaction.jta.platform">org.hibernate.service.jta.platform.internal.JBossAppServerJtaPlatform</prop>                                
     </props>
 </property>  
</bean>

<!-- The same to sessionFactory2 -->

<!-- TX config -->
<tx:annotation-driven/>
<tx:jta-transaction-manager/>

During startup Spring will try to find the server transaction manager by checking the following JNDI entries:
  • java:comp/TransactionManager
  • java:appserver/TransactionManager
  • java:pm/TransactionManager
  • java:/TransactionManager. Bingo, it will use com.arjuna.ats.jbossatx.jta.TransactionManagerDelegate

In each database there will be one table/entity: EntityOne and EntityTwo, with the same dummy structure:
@Entity
@Table(name = "tableOne")
public class EntityOne {
 @Id
 @GeneratedValue(strategy = GenerationType.IDENTITY)
 private Long id;

 private String code;

 private Date time;
 
 (...) 
}

Each test will consists of calling three transactional methods in a service:
@Override
@Transactional
public void testInsertOK() {
 final EntityOne entityOne = new EntityOne();
 entityOne.setTime(new Date());
 entityOne.setCode("Insert OK");
 entityOneDao.save(entityOne);

 final EntityTwo entityTwo = new EntityTwo();
 entityTwo.setTime(new Date());
 entityTwo.setCode("Insert OK");
 entityTwoDao.save(entityTwo);
}

@Override
@Transactional(rollbackFor=Exception.class)
public void testInsertMiddleError() {
 final EntityOne entityOne = new EntityOne();
 entityOne.setTime(new Date());
 entityOne.setCode("Insert with Middle Error");
 entityOneDao.save(entityOne);

 if (System.currentTimeMillis() > 0) {
  throw new RuntimeException("Kaboom in the middle");
 }

 final EntityTwo entityTwo = new EntityTwo();
 entityTwo.setTime(new Date());
 entityTwo.setCode("Insert with Middle Error");
 entityTwoDao.save(entityTwo);
}


@Override
@Transactional(rollbackFor=Exception.class)
public void testInsertFinalError() {
 final EntityOne entityOne = new EntityOne();
 entityOne.setTime(new Date());
 entityOne.setCode("Insert with Final Error");
 entityOneDao.save(entityOne);

 final EntityTwo entityTwo = new EntityTwo();
 entityTwo.setTime(new Date());
 entityTwo.setCode("Insert with Final Error");
 entityTwoDao.save(entityTwo);

 throw new RuntimeException("Kaboom at the end");
}

At the end of the tests, both tables will be listed in order to check which writes persisted and which were rolled back.

Summary


Tests results

Non JTA Datasource + Non JTA Datasource

Result:
EntityOne [id=1, code=Insert OK, time=2018-03-25 20:03:22.577]
EntityOne [id=2, code=Insert with Middle Error, time=2018-03-25 20:03:22.683]
EntityOne [id=3, code=Insert with Final Error, time=2018-03-25 20:03:22.698]

EntityTwo [id=1, code=Insert OK, time=2018-03-25 20:03:22.663]
EntityTwo [id=2, code=Insert with Final Error, time=2018-03-25 20:03:22.701]

Database writes are auto-commited inmeditely in both resources.
You can use both resources inside the same transaction, but they are not enlisted.
Each resource has its own "transaction boundary". If there is an error inside the transaction, as there is no rollback, you can get data inconsistency.

JTA Datasource + Non JTA Datasource

Result:
EntityOne [id=1, code=Insert OK, time=2018-03-24 19:16:51.645]

EntityTwo [id=1, code=Insert OK, time=2018-03-24 19:16:51.709]
EntityTwo [id=2, code=Insert with Final Error, time=2018-03-24 19:16:51.733]

JTA resource is managed inside a JTA Transaction, so transaction boundary is demarcated by the transaction manager.
Database writes are committed on transaction completion for JTA resource, and auto-committed inmediately for non JTA resource .
Thus, non JTA resource is not managed by transaction manager, if there is an error during the transaction, JTA resource is rolled back and non JTA resource is autocommitted.
You can get database inconsistencies.

Non JTA Datasource + JTA Datasource

Result:
EntityOne [id=1, code=Insert OK, time=2018-03-24 19:25:33.252]
EntityOne [id=2, code=Insert with Middle Error, time=2018-03-24 19:25:33.325]
EntityOne [id=3, code=Insert with Final Error, time=2018-03-24 19:25:33.335]

EntityTwo [id=1, code=Insert OK, time=2018-03-24 19:25:33.312]

Similar to previous scenario. In this case, the difference is due to the insertions order.
During an exception inside the transaction, only JTA resource is rolled back.

JTA Datasource + JTA Datasource

You get the following error:
19:37:52,308 WARN  [com.arjuna.ats.arjuna] (http-localhost/127.0.0.1:8080-2) ARJUNA012140: Adding multiple last resources is disallowed. Trying to add LastResourceRecord(XAOnePhaseResource(LocalXAResourceImpl@434c39c8[connectionListener=27aa95d connectionManager=5209886e warned=false currentXid=< formatId=131077, gtrid_length=29, bqual_length=36, tx_uid=0:ffffc0a80133:17004d06:5ab68ccc:26e, node_name=1, branch_uid=0:ffffc0a80133:17004d06:5ab68ccc:275, subordinatenodename=null, eis_name=java:jboss/datasources/ExampleDS2 > productName=H2 productVersion=@PROJECT_VERSION@ (2012-07-13) jndiName=java:jboss/datasources/ExampleDS2])), but already have LastResourceRecord(XAOnePhaseResource(LocalXAResourceImpl@414aa356[connectionListener=501a920b connectionManager=1519056b warned=false currentXid=< formatId=131077, gtrid_length=29, bqual_length=36, tx_uid=0:ffffc0a80133:17004d06:5ab68ccc:26e, node_name=1, branch_uid=0:ffffc0a80133:17004d06:5ab68ccc:272, subordinatenodename=null, eis_name=java:jboss/datasources/ExampleDS > productName=H2 productVersion=@PROJECT_VERSION@ (2012-07-13) jndiName=java:jboss/datasources/ExampleDS]))
19:37:52,309 INFO  [stdout] (http-localhost/127.0.0.1:8080-2) [2018-03-24 19:37:52,309] (SqlExceptionHelper.java:145) WARN http-localhost/127.0.0.1:8080-2 org.hibernate.engine.jdbc.spi.SqlExceptionHelper SQL Error: 0, SQLState: null

19:37:52,309 INFO  [stdout] (http-localhost/127.0.0.1:8080-2) [2018-03-24 19:37:52,309] (SqlExceptionHelper.java:147) ERROR http-localhost/127.0.0.1:8080-2 org.hibernate.engine.jdbc.spi.SqlExceptionHelper javax.resource.ResourceException: IJ000457: Unchecked throwable in managedConnectionReconnected() cl=org.jboss.jca.core.connectionmanager.listener.TxConnectionListener@27aa95d[state=NORMAL managed connection=org.jboss.jca.adapters.jdbc.local.LocalManagedConnection@1a5a5cf8 connection handles=0 lastUse=1521916672308 trackByTx=false pool=org.jboss.jca.core.connectionmanager.pool.strategy.OnePool@11371f69 pool internal context=SemaphoreArrayListManagedConnectionPool@6f62844[pool=ExampleDS2] xaResource=LocalXAResourceImpl@434c39c8[connectionListener=27aa95d connectionManager=5209886e warned=false currentXid=null productName=H2 productVersion=@PROJECT_VERSION@ (2012-07-13) jndiName=java:jboss/datasources/ExampleDS2] txSync=null]

You are trying to enlist two transactional resources in the same transaction, i.e., you are running in a global transaction. This scenario is only allowed with XA resources.

The error is quite clear:
ARJUNA012140: Adding multiple last resources is disallowed.
Trying to add LastResourceRecord(XAOnePhaseResource(... jndiName=java:jboss/datasources/ExampleDS2])), but already have LastResourceRecord(XAOnePhaseResource(... jndiName=java:jboss/datasources/ExampleDS]))

What it's saying is that you have a 1P resource (ExampleDS) in an active transaction, and you are trying to enlist a second 1P Resource (ExampleDS) in the same transaction. You can only do that with XA resources.

JTA Datasource + JTA XA Datasource

Response:
EntityOne [id=1, code=Insert OK, time=2018-03-25 12:29:42.584]

EntityTwo [id=1, code=Insert OK, time=2018-03-25 12:29:42.695]

OK, this can sound weird. You have one JTA resource (which only supports 1PC) enlisted in a global transaction with other XA resource (which do supports 2PC). This should be an error, because you can not ensure the 2PC, i.e, the transaction coordinator can not ask the JTA resource if it is prepared.

Here is where ARJUNA came to scene. JBoss uses ARJUNA as transaction core, and it uses a LRCO - Last Resource Commit Optimization:
The doc is surprisingly clear. You do can have a single non-XA resource inside a global transaction, but only if all the other resources do are XA. In order to perform the 2PC, in the first phase the non XA resource is processed last, and only if all the XA resources responded affirmatively to the prepare request, the non-XA Resources is committed immediately. During second phase the rest of XA Resources are committed normally.

The operations are as follow:
  1. Prepare 2PC (The XA Resources)
  2. Commit LRCO (The non-XA Resource)
  3. Write tx log
  4. Commit 2PC (The XA Resources)
But there is still an error opportunity if something crash in step 3. So, this is not a fully reliable scenario.

In order to improve LRCO there is the CMR - Commit Markable Resource, but it´s only valid for datasource (a transactional resource can be, for example, a JMS Queue, but you can not use CMR here). You need some extra configuration for this:
  • Set the non-XA datasource as connectable
  • Create a new table in database (the one for de non-XA datasource) to store XIDs
  • Link Jboss transaction subsystem with this datasource and this table

JTA Datasource + JTA XA Datasource

Same result as previous test.

XA Datasource + XA Datasource

Same result as previous test.
This is a full global transaction scenario with XA Resources.

JTA XA Datasource + Non JTA Datasource

Same result as "JTA Datasource + Non JTA Datasource"

Non JTA Datasource + JTA XA Datasource

Same result as "Non JTA Datasource + JTA Datasource"

sábado, 17 de febrero de 2018

JBoss - Check Vault, Users and JNDI entries

Almost all applications that we develop requires the use of encrypted strings, users with some specific role, or jndi entries. It is very common that, during the process of configuration, something goes wrong and you will have to lost much time trying to figure out what.

For example, your application publishes a web service, which is secured with security constraints, and only users with a proper role can consume it. The server is configured, the application is deployed, but when you try to invoke the service you get an 403 Unauthorized error. What it's wrong?, the user is not in the Application Realm of the server, the user credentials are not right, the vault password is wrong, the user has not the suitable rol?

I prepared a quite simple web app in order to test these problems easily: https://github.com/evazquezma/jboss/releases
Once deployed, from the index page, you can go to these pages:
  • http://localhost:8080/jboss-utils/vault
    Introduce a string in vault format and check the clear value.
  • http://localhost:8080/jboss-utils/users
    Introduce an user credentials and check if she exists, and which roles she has.
  • http://localhost:8080/jboss-utils/jndi
    Introduce a jndi key and check if it exists, its value and its class name.

viernes, 16 de febrero de 2018

Autofirma - Análisis de firma en Android

Siguiendo con el tema de Autofirma, en esta ocasión voy analizar los distintos mensajes intercambiados entre el navegador, Autofirma y los servidores de backend cuando se realiza una firma trifásica en Android.

Entorno

El entorno de la prueba es el siguiente:
  • Apache: 2.2
  • JBoss EAP 6.4
  • Android: 4.4.4
Además, los componentes involucrados son:
Componente Versión URL
Página de firma N/A http://192.168.43.239/sdxc/test/storageRetrieve
Autofirma Cliente movil firma 1.5 N/A
Server trifase 1.5 http://192.168.43.239/afirma-server-triphase-signer/SignatureService
Signature Storage 1.5 http://192.168.43.239/afirma-signature-storage/StorageService
Signature Retrieve 1.5 http://192.168.43.239/afirma-signature-retriever/RetrieveService
Directorio entrada server trifase N/A D:\tmp\afirma\entrada
Directorio salida server trifase N/A D:\tmp\afirma\salida
Directorio temporal servlets N/A D:\tmp\afirma\TriStorageRetrieve

Visión general

En esta prueba se lanzará una firma de tipo PAdES, sobre el fichero "prueba1.pdf", empleando el servidor trifase y los servlets de almacenamiento Sotrage y Retrieve.

El servidor trifase sirve para que la gestión del fichero que se va a firmar se haga en servidor y, por tanto, nunca se envíe completo al dispositivo del usuario. Este modo de funcionamiento se basa en tres etapas:
  1. Autofirma llama al servidor trifase para indicarle que prepare la firma. Es decir, que coja el fichero y prepare el hash que hay que firmar.
  2. Autofirma recibe el hash y lo firma con la clave privada del certificado de usuario.
  3. Autofirma llama al servidor trifase para indicarle que complete la firma. Es decir, que coja el hash firmado y lo "incruste" en el fichero a firmar.
Los servlets de almacenamiento sirven para permitir una comunicación bidireccional entre el navegador de usuario y Autofirma cuando ésta no puede hacerse de forma directa. Si el navegador o el dispositivo de usuario no permiten el uso de sockets (tanto por restricciones tecnológicas como de seguridad), se emplean estos servlets a modo de repositorio intermedio. Autofirma escribe datos y el navegador de usuario los lee. Según he visto, el contenido que se guarda en estos ficheros intermedios va cifrado con una clave generada por el navegador al comienzo del proceso.

El uso de server trifase y de los servlets de almacenamiento es independiente entre sí. Es decir, se puede usar server trifase sin servlets, y se pueden usar servlets sin server trifase. También se puede realizar la firma sin ninguno de los dos.
  1. Si sólo se emplea server trifase, el navegador obligatoriamente debe soportar sockets. La comunicación entre navegador y autofirma se hace de forma directa. La ventaja es que el fichero a firmar no sale del backend.
  2. Si sólo se emplean los servlets, el navegador envía a Autofirma el fichero a firmar (se envía como cadena Base 64 durante la invocación). Al terminar la firma, Autofirma deja el fichero firmado (completo) en el repositorio intermedio para que lo lea el navegador. La ventaja es que el navegador no necesita soportar sockets.
  3. Si no se emplea ninguno de los dos mecanismos anteriores, el navegador debe soportar sockets. El fichero a firmar se envía durante la invocación y, una vez firmado, se recupera a través de un socket. La ventaja es que es el método más simple.
Combinando server trifase y servlets de almacenamiento se consigue que el navegador no tenga que soportar sockets, que el fichero no salga del backend, y que los mensajes intercambiados con los servlets de almacenamiento no contengan la firma en sí, sino información acerca de su finalización.

Mensajería

A continuación un ejemplo de firma correcta. Las trazas que incorporo provienen de dos fuentes:

1 - Navegador - Autofirma

Dese el navegador se hace una invocación por protocolo a autofirma pasándole los siguientes parámetros: 
intent://sign?ver=1&op=sign&id=8wp29aKd7L4486I60UrR&key=11095593&stservlet=http://192.168.43.239/afirma-signature-storage/StorageService&format=PAdEStri&algorithm=SHA512withRSA&properties=c2VydmVyVXJsPWh0dHA6Ly8xOTIuMTY4LjQzLjIzOS9hZmlybWEtc2VydmVyLXRyaXBoYXNlLXNpZ25lci9TaWduYXR1cmVTZXJ2aWNl&dat=cHJ1ZWJhMS5wZGY=#Intent;scheme=afirma;package=es.gob.afirma;end

Aquí, los parámetros relevantes son:
  • op. Operación de firma
  • id. Es un identificador que se empleará para nombrar los ficheros de "intercambio" que gestionará el Signature Storage y Retrieve.
  • key. Algún tipo de clave generada para cifrar ciertos mensajes.
  • Dirección de estos servlets
  • formato y algortimo de firma
  • properties. Contiene los parámetros adicionales, en este caso la dirección del server trifase.
  • dat. Identificador del fichero que se va a firmar (cHJ1ZWJhMS5wZGY=) 

2 - Autofirma - Server trifase (Prefirma)

Después de que el usuario selecciona el certificado de firma, Autofirma lanza un petición contra server trifase indicándole los datos del fichero que se quiere firmar y el certificado del firmate (sólo clave pública e identificación):
POST /afirma-server-triphase-signer/SignatureService

op=pre&cop=sign&format=pades&algo=SHA512withRSA&cert=MIII(...)A4=&doc=cHJ1ZWJhMS5wZGY=&params=IwojRnJpIEZlYiAxNiAxMjowMTo0OCBDRVQgMjAxOApzZXJ2ZXJVcmw9aHR0cFw6Ly8xOTIuMTY4LjQzLjIzOS9hZmlybWEtc2VydmVyLXRyaXBoYXNlLXNpZ25lci9TaWduYXR1cmVTZXJ2aWNlCg==

Parseando los parámetros tenemos:
  • op=pre. Operación de prefirma
  • cop=sign. Código de operación de firma
  • format=pades. Firma PAdES
  • algo=SHA512withRSA. Algoritmo de firma
  • cert=MIII(...). Certificado del firmante (parte pública)
  • doc=cHJ1ZWJhMS5wZGY=. Nombre del documento que se va a firmar. En este caso "prueba1.pdf"
  • params=Iwoj(...). Parámetros adicionales. En este caso contiene la dirección completa del servidor trifase, es decir, se referencia a sí mismo
Cuando el server trifase recibe esta petición, imprime el siguiente log:
12:01:48,611 INFO  [es.gob.afirma] (ajp-/0.0.0.0:8009-1) == INICIO FIRMA TRIFASICA ==
12:01:48,614 INFO  [es.gob.afirma] (ajp-/0.0.0.0:8009-1) Recuperamos el documento mediante el DocumentManager
12:01:48,614 INFO  [es.gob.afirma] (ajp-/0.0.0.0:8009-1) Recuperamos el documento con identificador: cHJ1ZWJhMS5wZGY=
12:01:48,615 INFO  [es.gob.afirma] (ajp-/0.0.0.0:8009-1) Buscamos el fichero: D:\tmp\afirma\entrada\prueba1.pdf
12:01:48,617 INFO  [es.gob.afirma] (ajp-/0.0.0.0:8009-1) Recuperado documento de 175247 octetos
12:01:48,617 INFO  [es.gob.afirma] (ajp-/0.0.0.0:8009-1) Formato de firma seleccionado: pades
12:01:48,617 INFO  [es.gob.afirma] (ajp-/0.0.0.0:8009-1)  == PREFIRMA en servidor
12:01:48,618 INFO  [es.gob.afirma] (ajp-/0.0.0.0:8009-1) Prefirma PAdES - Firma - INICIO
12:01:48,618 INFO  [es.gob.afirma] (ajp-/0.0.0.0:8009-1) Se invocan las funciones internas de prefirma PAdES
12:01:48,641 INFO  [es.gob.afirma] (ajp-/0.0.0.0:8009-1) Se ha seleccionado la generacion de CAdES para inclusion en PAdES
12:01:48,644 INFO  [es.gob.afirma] (ajp-/0.0.0.0:8009-1) Se prepara la respuesta de la prefirma PAdES
12:01:48,644 INFO  [es.gob.afirma] (ajp-/0.0.0.0:8009-1) Prefirma PAdES - Firma - FIN
12:01:48,644 INFO  [es.gob.afirma] (ajp-/0.0.0.0:8009-1) Se ha calculado el resultado de la prefirma y se devuelve
12:01:48,645 INFO  [es.gob.afirma] (ajp-/0.0.0.0:8009-1) == FIN PREFIRMA

Básicamente lee el fichero que se solicita y prepara el hash que tendrá que deberá firmar Autofirma. Con esto se evita devolver todo el fichero.

El resultado es un XML, en base 64, con la siguiente estructura:

<xml>
 <firmas>
  <firma Id="73d6e601-7442-4737-aee2-6aa699cdc393">
   <param n="NEED_PRE">true</param>
   <param n="TIME">1518778908618</param>
   <param n="PRE">(....)</param>
   <param n="PID">WzxkYzQ5NmI1Y2ZjZDAxZDJmNTYwNGQzZWQwNTlhM2RkNz48NGM0YTA2ODc0OTM2MDg1OTNlOTU2MjYxODViYTIyNTI+XQ==</param>
  </firma>
 </firmas>
</xml>

De aquí, lo más salientable es que en el tag "PRE" da la impresión de que se devuelve la el hash a firmar, junto con información del propio certificado.

2 - Autofirma - Server trifase (Postfirma)

Autofirma realiza la firma en local empleando la clave privada del certificado de usuario, que nunca sale del dispositivo. 
Al terminar vuelve llamar al server trifase para que "incruste" esta firma en el PDF.
Los parámetros de la petición son:
POST /afirma-server-triphase-signer/SignatureService

op=post&cop=sign&format=pades&algo=SHA512withRSA&cert=MIII(...)&doc=cHJ1ZWJhMS5wZGY=&session=PHhtb(...)&params=IwojRnJpIEZlYiAxNiAxMjowMTo0OCBDRVQgMjAxOApzZXJ2ZXJVcmw9aHR0cFw6Ly8xOTIuMTY4LjQzLjIzOS9hZmlybWEtc2VydmVyLXRyaXBoYXNlLXNpZ25lci9TaWduYXR1cmVTZXJ2aWNlCg==

Los parámetros son casi los mismos que en el mensaje de prefirma, cambiando la operación. Pero, además, en esta ocasión llega un parámetro session que contiene un XML con el resultado de la firma.
El contenido de session se pinta en los logs del server trifase;
12:01:48,757 INFO  [es.gob.afirma] (ajp-/0.0.0.0:8009-1) == INICIO FIRMA TRIFASICA ==
12:01:48,764 INFO  [es.gob.afirma] (ajp-/0.0.0.0:8009-1) Recibidos los siguientes datos de sesion para 'post':
<xml>
 <firmas>
  <firma Id="73d6e601-7442-4737-aee2-6aa699cdc393">
   <param n="PRE">MYI(...)</param>
   <param n="PK1">s/5oZ(...)</param>
   <param n="PID">WzxkYzQ5NmI1Y2ZjZDAxZDJmNTYwNGQzZWQwNTlhM2RkNz48NGM0YTA2ODc0OTM2MDg1OTNlOTU2MjYxODViYTIyNTI+XQ==</param>
   <param n="TIME">1518778908618</param>
   <param n="NEED_PRE">true</param>
  </firma>
 </firmas>
</xml>
12:01:48,765 INFO  [es.gob.afirma] (ajp-/0.0.0.0:8009-1) Recuperamos el documento mediante el DocumentManager
12:01:48,766 INFO  [es.gob.afirma] (ajp-/0.0.0.0:8009-1) Recuperamos el documento con identificador: cHJ1ZWJhMS5wZGY=
12:01:48,766 INFO  [es.gob.afirma] (ajp-/0.0.0.0:8009-1) Buscamos el fichero: D:\tmp\afirma\entrada\prueba1.pdf
12:01:48,767 INFO  [es.gob.afirma] (ajp-/0.0.0.0:8009-1) Recuperado documento de 175247 octetos
12:01:48,767 INFO  [es.gob.afirma] (ajp-/0.0.0.0:8009-1) Formato de firma seleccionado: pades
12:01:48,768 INFO  [es.gob.afirma] (ajp-/0.0.0.0:8009-1)  == POSTFIRMA en servidor
12:01:48,804 INFO  [es.gob.afirma] (ajp-/0.0.0.0:8009-1) Postfirma PAdES - Firma - INICIO
12:01:48,804 INFO  [es.gob.afirma] (ajp-/0.0.0.0:8009-1) Se invocan las funciones internas de postfirma PAdES
12:01:48,820 INFO  [es.gob.afirma] (ajp-/0.0.0.0:8009-1) Postfirma PAdES - Firma - FIN
12:01:48,820 INFO  [es.gob.afirma] (ajp-/0.0.0.0:8009-1)  Se ha calculado el resultado de la postfirma y se devuelve. Numero de bytes: 227838
12:01:48,820 INFO  [es.gob.afirma] (ajp-/0.0.0.0:8009-1) Almacenamos la firma mediante el DocumentManager
12:01:48,826 INFO  [es.gob.afirma] (ajp-/0.0.0.0:8009-1) Escribiendo el fichero: D:\tmp\afirma\salida\prueba1.pdf
12:01:48,826 INFO  [es.gob.afirma] (ajp-/0.0.0.0:8009-1) Documento almacenado
12:01:48,827 INFO  [es.gob.afirma] (ajp-/0.0.0.0:8009-1) == FIN POSTFIRMA

Dentro del tag "PRE" se manda lo mismo que se recibió en la petición anterior. A mayores en el campo "PK1" irá la firma en sí.

Como resultado se devuelve un mensaje de OK referenciando el fichero que se acaba de firmar.
OK NEWID=cHJ1ZWJhMS5wZGY=

3 - Autofirma - Signature Storage

Cuando la firma ya se completó, Autofirma llama al Signatura Storage para decirle que cree el fichero de intercambio y que dentro guarde cierta información.
POST /afirma-signature-storage/StorageService

op=put&v=1_0&id=8wp29aKd7L4486I60UrR&dat=5.G0z2jkmD9erRoyvk0bCobg==

Se le indica que cree el fichero 8wp29aKd7L4486I60UrR y que escriba en él el texto indicado en la variable dat. Aparentemente es algún tipo de texto cifrado empleando un algoritmo de clave simétrica...

En el servidor, el Signature Storage genera los siguientes mensajes de log:
12:01:48,865 INFO  [es.gob.afirma] (ajp-/0.0.0.0:8009-1)  == INICIO GUARDADO == 
12:01:48,866 INFO  [es.gob.afirma] (ajp-/0.0.0.0:8009-1) Se solicita guardar un fichero con el identificador: 8wp29aKd7L4486I60UrR
12:01:48,914 INFO  [es.gob.afirma] (ajp-/0.0.0.0:8009-1) Se guardo correctamente el fichero: D:\tmp\afirma\TriStorageRetrieve\8wp29aKd7L4486I60UrR
12:01:48,915 INFO  [es.gob.afirma] (ajp-/0.0.0.0:8009-1) == FIN DEL GUARDADO ==

4 - Navegador - Signature Retrieve

La forma que tiene el navegador de saber si la firma se ha completado o, en su caso, si se ha producido algún error, es invocando al Signature Retrieve. Se le pide el fichero cuyo nombre se preacordó al comienzo, y que contiene un texto cifrado indicativo de que la firma ha ido bien.

En el servidor, el Signature Retrieve genera los siguientes mensajes de log:
12:01:49,019 INFO  [es.gob.afirma] (ajp-/0.0.0.0:8009-1) == INICIO DE LA RECUPERACION ==
12:01:49,020 INFO  [es.gob.afirma] (ajp-/0.0.0.0:8009-1) Se solicita el fichero con el identificador: 8wp29aKd7L4486I60UrR
12:01:49,021 INFO  [es.gob.afirma] (ajp-/0.0.0.0:8009-1) Se recupera el fichero: 8wp29aKd7L4486I60UrR
12:01:49,022 INFO  [es.gob.afirma] (ajp-/0.0.0.0:8009-1) == FIN DE LA RECUPERACION ==
12:01:49,022 INFO  [es.gob.afirma] (ajp-/0.0.0.0:8009-1) Limpiamos el directorio temporal
12:01:49,023 INFO  [es.gob.afirma] (ajp-/0.0.0.0:8009-1) Fin de la limpieza

Al recuperar el resultado de la firma (el navegador no obtiene la firma en sí, porque esta todavía está en el directorio de salida del server trifase) el navegador sabrá si el proceso ha ido bien y, según proceda, llamar a los callbacks de éxito o error.

sábado, 3 de febrero de 2018

JBoss EAP 6.4 and Hibernate 5 - JBoss Logging problems

Problem

When working with Hibernate 5 in JBoss EAP 6.4 you can get the following error: java.lang.NoSuchMethodError: org.jboss.logging.Logger.debugf(Ljava/lang/String;I)V
Caused by: java.lang.NoSuchMethodError: org.jboss.logging.Logger.debugf(Ljava/lang/String;I)V
 at org.hibernate.internal.NamedQueryRepository.checkNamedQueries(NamedQueryRepository.java:149)
 at org.hibernate.internal.SessionFactoryImpl.checkNamedQueries(SessionFactoryImpl.java:769)
 at org.hibernate.internal.SessionFactoryImpl.<init>(SessionFactoryImpl.java:484)
 at org.hibernate.boot.internal.SessionFactoryBuilderImpl.build(SessionFactoryBuilderImpl.java:444)
 at org.hibernate.cfg.Configuration.buildSessionFactory(Configuration.java:708)
 at org.hibernate.cfg.Configuration.buildSessionFactory(Configuration.java:724)
 at org.springframework.orm.hibernate5.LocalSessionFactoryBean.buildSessionFactory(LocalSessionFactoryBean.java:416)
 at org.springframework.orm.hibernate5.LocalSessionFactoryBean.afterPropertiesSet(LocalSessionFactoryBean.java:401)
 at org.springframework.beans.factory.support.AbstractAutowireCapableBeanFactory.invokeInitMethods(AbstractAutowireCapableBeanFactory.java:1637)
 at org.springframework.beans.factory.support.AbstractAutowireCapableBeanFactory.initializeBean(AbstractAutowireCapableBeanFactory.java:1574)

Cause

The root cause is that Hibernate 5 requires jboss-logging-3.3.0.Final.jar library, while JBoss EAP packs jboss-logging-3.1.4.GA-redhat-2.jar. This error is produced when NamedQueryRepository class is trying to call the debugf(String format, Object param1) method of org.jboss.logging.Logger class.
This method exists in version 3.3.0 but not in version 3.1.4. As Jboss loads the former one, there is one incompatibiltiy.

This is the hibernate code which calls this method, org.hibernate.internal.NamedQueryRepository:


And this is the method implementation in org.jboss.logging.Logger: 


Jboss EAP 6.4 is integrated with hibernate-core-4.2.18.Final (https://access.redhat.com/articles/112673#EAP_6), which in turn required jboss-logging-3.1.0 (https://mvnrepository.com/artifact/org.hibernate/hibernate-core/4.2.18.Final)

Solution

In thease cases the solution is obvious. Just use jboss-deployment-structure and exclude Hibernate and Logging stuff in order to use all dependencies packet in the application´s lib directory. So, the first guess would be something like this:
<?xml version="1.0" encoding="UTF-8"?>
<jboss-deployment-structure>
 <deployment>     
  <exclude-subsystems>
   <subsystem name="jpa" /> 
   <subsystem name="logging" />
  </exclude-subsystems>
  
  
  <exclusions>     
   <module name="org.hibernate"/>
   <module name="javax.persistence.api"/>
   <module name="org.hibernate.envers"/>
   <module name="org.hibernate.validator"/>
   <module name="org.hibernate.commons-annotations"/>  
   <module name="org.jboss.as.jpa.hibernate"/> 
   <module name="org.jboss.as.jpa"/> 
   <module name="org.jboss.as.jpa.util"/>  
   <module name="org.jboss.as.jpa.hibernate "/> 
   <module name="org.jboss.as.jpa.spi"/>  
   <module name="org.jboss.as.osgi.jpa"/>
   
   <module name="org.jboss.logging" /> 
   <module name="org.apache.commons.logging" />  
   <module name="org.apache.log4j" />  
   <module name="org.slf4j" />  
   <module name="org.jboss.logging.jul-to-slf4j-stub" />  
  </exclusions>
       
 </deployment>
</jboss-deployment-structure>

Unfortunately this doesn't work. There must be some kind of bug in Jboss EAP 6.4 and jboss-logging 3.1.0 is still be using. For the record, this do works with Jboss EAP 6.2.

After some digging, the solution appears to be to exclude org.jboss.resteasy.resteasy-jaxrs too. The final jboss-deployment-structure will be this:
<?xml version="1.0" encoding="UTF-8"?>
<jboss-deployment-structure>
 <deployment>     
  <exclude-subsystems>
   <subsystem name="jpa" /> 
   <subsystem name="logging" />
  </exclude-subsystems>
  
  
  <exclusions>
   <module name="org.jboss.resteasy.resteasy-jaxrs"/>     
   <module name="org.hibernate"/>
   <module name="javax.persistence.api"/>
   <module name="org.hibernate.envers"/>
   <module name="org.hibernate.validator"/>
   <module name="org.hibernate.commons-annotations"/>  
   <module name="org.jboss.as.jpa.hibernate"/> 
   <module name="org.jboss.as.jpa"/> 
   <module name="org.jboss.as.jpa.util"/>  
   <module name="org.jboss.as.jpa.hibernate "/> 
   <module name="org.jboss.as.jpa.spi"/>  
   <module name="org.jboss.as.osgi.jpa"/>
   
   <module name="org.jboss.logging" /> 
   <module name="org.apache.commons.logging" />  
   <module name="org.apache.log4j" />  
   <module name="org.slf4j" />  
   <module name="org.jboss.logging.jul-to-slf4j-stub" />  
  </exclusions>
       
 </deployment>
</jboss-deployment-structure>

sábado, 13 de enero de 2018

Connect to desktop web server from mobile device

The problem

I hava a Java EE application running in my development enviroment, i.e, in a desktop PC. This PC is connected to my company LAN network by using an ethernet cable.
This application uses some advance signature functions, which requiere a third party app would be installed in the client device. In this case, this application is Autofirma (it can be download from here). In my desktop environment it works fine, but we must certificate it also works in mobile devices, like Android and iOS devices.
The problem is that in order to test this web application you need to must to it from the mobile device. At this time there is not a suitable wirless connection in the company which allows this kind of tests, so you have to come out with your own solution.
I´ve been checking ways to connect my mobile device to the PC via USB cable, but I did not found a valid or easy-to-make solution. So I will propose my low-technology solution.

Target scenario

My solution consists in connect the mobile device and the desktop PC via WI-FI, by using a third mobile device as WI-FI hotspot. It also requires a WI-FI dongle or a WI-FI card in the desktop PC.
This is the whole picture of the solution.

For this simple test, I will access to my Apache Web Server home page from the android tablet.


The full environment elenemts and caracteristis are as follows:
  • Desktop PC (Development environment): Windows 7
  • WI-FI dongle: Who cares
  • Tester mobile device: Samsung Galaxy Tab 3
  • WI-FI hotspot: Motorola Moto E

Set up

Wi-Fi hotspot

In Android is very easy to configure your device as a WI-FI hotspot. This is primary intended to let other devices use its 3G/4G connection via WI-FI.
Go to settings > More > Modem and Wi-Fi zone


There you must enable the Wi-Fi hotstpot and, optionally, set up your security settings.

Desktop PC 

In the desktop PC you need to plug the USB dongle and install all required drivers. Unless you are using an extremely cheap chinese dongle, windows will recognize and configure it for you.
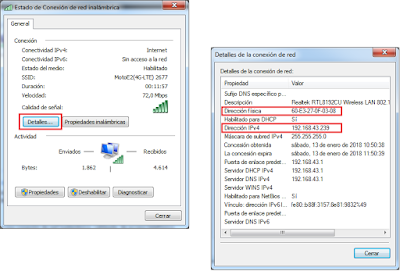
In your network manager you will see two networks: the LAN network and the wirless network. For this last one, if you previously enable security settings in your Wi-Fi hotspot, you will have to introduce your password before the connection could be established.


Each network connection will have its own MAC and IP address. In my case, my "ETH IP" is 192.168.1.134 and my "WI-FI IP" is 192.168.43.239.


Tester mobile device

In the android tablet, you just need to select the Wi-Fi hotspot wirless network.

Test

In the desktop PC my Apache Web Server is running on port 80. So, if you go to http://localhost you will see it. But from the tester mobile device point of view, this IP address is 192.168.43.239.
So you need to access to http://192.168.43.239. 

Trouble shooting

In order to this scenario works you may need to disable/configure the desktop PC firewall. 

viernes, 5 de enero de 2018

Oracle - Avoid user password expiration

When you connect to Oracle you see this warning: "The password wil expire within %s days"


Check all profiles:
select * from dba_profiles


Check the profile assigned to one user:
select profile from DBA_USERS where username = 'MyUser';


For this profile, filter its limits:
select resource_name,limit from dba_profiles where profile='DEFAULT';


Check user account status and expiration date for this user:
select username, account_status, expiry_date from dba_users where username='MyUser';

With this information we know that our user is assigned to the Default profile, which has an expiration policy of 180 days. Also, this user´s password will expire on 09/01/2018. To avoid this, just update the profile´s policy.
alter profile DEFAULT limit PASSWORD_LIFE_TIME  unlimited;

The last thing to do is reset the password to its own value, in order to restart the account status to OPEN. Depending on your Oracle version, you can obtain this password by two means:
select password from dba_users where username='MyUser';

select spare4 from sys.user$ where name='MyUser';

Only one of them will return a non NULL value. Then update the user.
alter user MyUser identified by values 'S:9090878D...;T:193A657B...';